DIY Laptop Sleeve
Hey everyone!
If you've been following me on instagram, you'd know that I was taking on quite a tedious DIY project a week or so ago, and now, I figured it's a good time to share it with you guys! Of course, I don't expect everyone to be all excited about sewing sequins one by one, it takes patience and it took me a good 4 or 5ish days to complete this project but I'm just so happy that I have something that is unique and is of MY design.
The Front
The Back!
In case you guys are wondering, yes, I did get a new macbook. It was an early birthday present from my parents, and it was early because Challenger was having a super good deal (thank god) AND my old laptop's trackpad was close to unusable and on the verge of popping out from the laptop so, a new one was required.
A moment of silence, for my old laptop who has served me for a good 5 over years.
I've moved on now, to something lighter, and bigger. I think it's crazy because I decided to get the 15inch Macbook pro with the touch bar and it's so different from my old 13inch~ It's so much easier to edit videos and at the same time, the touch bar makes me send emails prematurely which is so embarrassing. Apart from that, I'm loving it, and a new laptop calls for a new case~
So these are what I used!
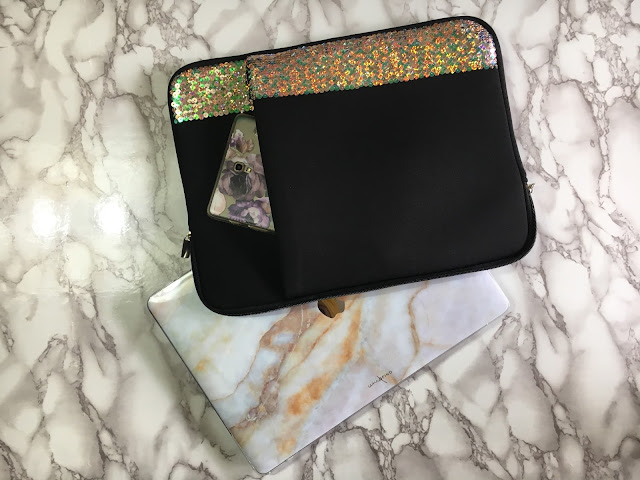
I decided to make use of sequins because they were the closest thing to glitter. My case is just a plain neoprene sleeve with a pocket in front. I did get one that was very baggy in case I wanted to shove books or documents along with my laptop.
I got the sleeve off Carousell for $15 and the sequins from Chinatown for $30 ($8 per yard). I did get too many sequins, I may have been able to get away with my project with 1/3 of what I bought! I did intend to cover the ENTIRE case in sequins at first but I realised:
- It was probably going to take me forever.
- It was going to look like a deflated disco ball.
I decided to do something simple instead, so I ended up with a strip across the front and a unicorn at the back! I used three types of sequins in my design:
Gold
Holographic Bronze
Clear Holographic
Sequins against the black Neoprene!
I realised that the clear holographic turned green/blue against the black background of the sleeve so I didn't exactly achieve what I had intended, which was more of a pink, rose gold and gold theme. Then again, the end product looked pretty good so I'm fine that it wasn't all pink and rose gold-y!
Used a silver metallic thread to sew my sequins on!
And it begins!
Started with a line across!
And went from there!
I sewed on each sequin individually so that it's easier to fix if they did fall off. Sometimes sequins do bend and begin to scratch at anything and everything, so I had to bear that in mind while sewing them down. I also found that it's easy to sew into neoprene because it's so thick but has a sponge-y texture which makes needle work easy!
Kept my sequins in little tubs so they were easy to access!
The sequins I bought came stung up together, so I separated them as I didn't want to simply sew down strips of sequins. Instead, I wanted to sew them in a random haphazard pattern to create the illusion of mermaid scales, which I suppose I almost achieved? I may have been better off with bigger sequins but the bigger ones weren't nearly as cheap (or pretty) as these!
Begining on the side!
I decided to continue the strip across the entire sleeve and not just on the front pocket. I did want to create a more 'seamless' pattern but from the side, you definitely know there's a massive pocket.
Finishing up!
Front is done!
Sketching out my design~
I think it's pretty obvious that my initial plans for this sleeve really didn't happen. I did start the unicorn sketch with an eye and a fuller mane.. Somehow those disappeared..
Started with the outline of the mane
Then the face!

Results!
I intended to fill up the entire mane but I decided against it because the unicorn face was so bright already, so I left it as it was and I'm really happy with it! The eye disappeared and so did part of the mane but hey, I guess it still looked pretty good, right?
Now that the case is done, I needed to feed my marble obsession with another laptop skin from uniqfind! I'm not sponsored by them, but I've been a fan of their products for ages. I got my first marble laptop skin from them as well back when I was using my 13inch, and I decided that my new laptop needed some amrble lovin' as well!
Got the Vanilla marble and the clear case!
The old macbook vs the new one!
IT'S SO GORGEOUS I LOVE IT.
I think it's obvious that they have grown so much since 2014. They have so many patterns to chose from and they even have their logo on the skin now which I think is so so pretty. The quality is amazing and it's so easy to stick on and remove (if you ever need to). It's cut so well and I'm glad I stumbled upon them years ago and that they are still around and growing!
I should add that they did ship it all the way from Canada (or US, I'm not TOO sure), but it got to me super fast, almost a week before I expected it to come so that's just really amazing. I cannot get over the quality and I always feel that the quality that I get from Uniqfind is worth the price and overseas shipping.
I realised the clear case was a gamble as well as I didn't know how thin or lightweight it was going to be, but it feels great, it doesn't add too much bulk and barely any weight so I absolutely love it!
Here's to the pretty things in life!
I hope you guys enjoyed this blogpost and that you do get some inspirations if you're thinking about doing your own laptop cases as well! Till my next blogpost!
xx
Shayne


